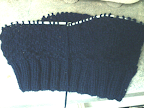
The Deep Sea Hat
The Deep Sea Hat is completed, and it has such a nice fit! It took me over two weeks to complete, specifically because I only did a bit at a time. This hat can be worn as a hat (straight on) and a cap (slanted back), so it's quite nifty! If you look closely, you can see the pattern. This is the first pattern I've made myself, so it's bound to have some errors.

Pattern notes:
If you want, you can do the purls (after the ribbing) in a different color, to make the pattern more accented. Repeat between **s until the end.
If you wish to do the pattern flat, for all odd rows do the pattern backwards, then purling where it says knitting & vice versa.
Supplies:
- 1 skein worsted weight yarn. I used TMA yarn Fashion knit in New Navy (or a deep blue color)
- (optional)1 skein of white, green, or blue yarn
- Circular needles or double pointed needles size 6 or what size you need to get that gauge
- (optional) straight needles
- yarn needle
Stitches:
- Broken chevron (while doing the pattern below, intermittently knit where you should purl to break the chevron and create waves)
- 2x2 ribbing
Pattern (in round):
(read notes before starting)
CO 90 (80, 100, depending on the size you want. 90 is for a large.)
Row 1: k2 p2 ribbing
Do this for about 12-14 rows, depending on how long you want it to be.
Then do the chevron pattern, as follows:
Row 1: *p1, k3*
Row 2: *kl, p1, k5, p1*
Row 3: *k2, p1, k3, p1, k1*
Row 4: *k3, p1, k1, p1, k2*
Repeat these rows until there are about 5 to 5 1/2 inches, depending on how loose you want the hat to be.

Then we will start decreasing:
Row 1: *p1, k3, p1, k3, p1, k2tog*
Row 2:*k1, p1, k5, p1, k2tog*
Row 3: *k2, p1, k3, p1, k2tog*
Row 4: *k3, p1, k1, p1, k2tog*
Row 5: *p1, k3, p1, k2tog*
Row 6: *k1, p1, k2, k2tog*
Row 7: *k2, p1, k2tog*
Row 8: *k2, p2tog*
Row 9: *k1, p2tog*
Row 10: *k2tog*
(optional) Row 11: *k2tog*
To finish, cut the yarn, leaving a long tail, and do a finishing stitch of your choice with the remaining stitches (I had four). Now the hat is complete. If you decide to make this pattern, please comment & tell me what you think!


